Easy Roast Chicken

As the cool weather sets in, I have been itching to make some cozy dinners. Most days of the week I find myself sticking to the same dinner dishes, but I like to try to add a new meal to my repertoire at least once a week. On a normal weekday, I am out of the house for close to 10 hours and often don’t get home before 6:00. A busy work week makes cooking experimentation difficult!

One of my favorite weekend rituals is spending mornings watching The Food Network and The Cooking Channel.  I personally find it comforting to have cooking shows on in the background as I drink coffee and attend to other household chores. One of my favorite chefs to watch and learn from is Ina Garten. I have seen her “Roast Chicken” episode a few times and I finally decided to give her recipe a try.

Although I don’t think I could make this as a weeknight meal because of the extended cook time, I think it is a great dinner option for the weekend. Minimal time is needed for preparing the chicken, and following the recipe is fairly easy. My major recommendation is to make sure to generously season the chicken {about 7 lbs} and roast it for about 2 hours to least 165 degrees.

Whenever I prepare raw chicken, I wash and put away any other dishes in the sink or on the counters to spare them from contamination. I also use a separate cutting board strictly for raw chicken. After I put the chicken in the oven, I focus my attention to cleaning the countertops.  Although I have heard mixed reviews about using diluted white vinegar for cleaning granite counters, I have not had any problems. I mainly use Method brand cleaning products for cleaning the kitchen, but cleaning while cooking raw chicken is an exception.

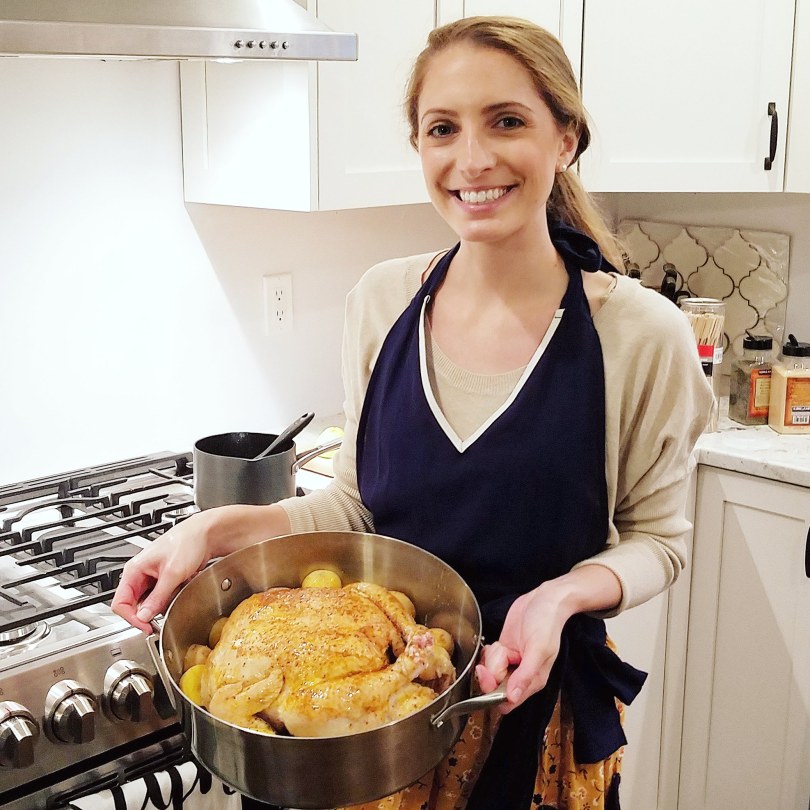
I have a Samsung slide-in oven which has a convection roast setting. I pre-heated the oven to 425 degrees. Don’t forget to adjust your racks before your preheat your oven. First, I cut a lemon into quarters, followed by cutting an onion into thick slices and lastly cutting the potatoes into halves. To prepare the chicken I removed the innards {didn’t know they would be in a bag – how nice!}. Next, I rinsed the chicken under cool water and patted it dry. I then seasoned the cavity with salt, black pepper, Herb de Provence, fresh garlic cloves, onion and lemon wedges.

Unfortunately, as soon as I was ready to put the chicken in the oven, I realized I didn’t have kitchen twine. {Was I supposed to register for that for my bridal shower?} Twine is important because it helps the chicken cook evenly and prevents the legs from burning. I opted for dental floss {sorry, mom} and it worked out fine. It’s also important to prevent the wings from burning. I could have tucked the wings under the body of the chicken, but they seemed pretty snug as they were.

I have a roasting pan, but I opted for my wide Calphalon Dutch oven. I placed the potatoes and onions at the bottom of the pan. Looking back, I could have also added carrots and celery.  I tied the legs with “twine” I placed the chicken on top of the vegetables {this helps the air circulate around the chicken}. I seasoned the outside of the chicken with salt, pepper, garlic powder, paprika and basted it with melted butter.

I am happy and equally proud to check this recipe off my “to-try” list. I will definitely be making it again. Check back soon to see what yummy meal I made with the leftovers!

xo Miss Alyss

Wedding Planning: Checklist & Managing Stress!

Last year shortly after becoming engaged, I thought to myself, “I’m not going to be a crazy bride and stress myself out.” For the most part, that held true. However, the beginning of wedding planning felt overwhelming at times because we had also recently purchased our first home and began renovating shortly after. We picked locations for our ceremony and venue rather quickly, and were grateful for the smoothness of the process. Once that was done, we checked off the next big vendors – photographer, videographer, DJ, limos and florist {most of which came from family recommendations}. Checking these big “To-Dos” off the list felt good!

Next up was the engagement party planning and asking our friends and family to be included in our bridal party.  Our engagement party turned out perfect! It was such a fun day and I was able to incorporate my bridesmaids’ gifts into the party. I was able to use almost all of my engagement party decor for my wedding, which turned out to be a huge time and money saver.

After the engagement party, planning slowed down a bit. I found my wedding dress, secured an awesome make-up artist and picked out bridesmaids dresses. The bridesmaid dresses were harder to decide on than my own dress because I wanted the dress to be affordable, yet flattering.

At this point (February) I felt like wedding planning was cruising. I had put together a detailed To-Do checklist (download at bottom of post!) and eventually created a binder of wedding essentials. In April, we completed our Pre-Cana course for our wedding ceremony. By June, I knew I needed to start focusing more. I found my shoes, finalized our guest list and picked a suit for the groomsmen. I also picked our invitations – enter stress!

(Sidebar: Looking back, these are the things that I could have checked-off my list earlier:)

  1. Invitations
  2. Picked a hair stylist
  3. Finalized ceremony readings and music
  4. Finalized the DJ checklist
  5. Ordered Wedding Bands
  6. My Wedding Day Jewelry
  7. Order Favors

A lot of unexpected details went into the invitations. There are SO many options and styles to choose from. I ordered 6 samples from Etsy to figure out which style fit best with the theme I envisioned for the wedding. Proofreading the invitation itself seemed stressful, but thankfully I had family and friends to help me out, which resulted in many laughs in the process. Along with proofreading my invitation, I also had to proof read and edit the mailing addresses.

After many hours revising and perfecting the invitation, I loved the sample I chose. Unfortunately, the vendor changed the listing I purchased on Etsy and was not clear in communicating the change in the product. When the invitations arrived in August, they were not what I had expected, leading to a minor freak out and a few many tears.  Ultimately, I realized that if I ignored the sample they were still beautiful invitations {I actually received a lot of compliments}. I also needed to send the invitations out ASAP, so ordering new ones wasn’t a great option.

By mid-August the stress started setting in and it didn’t seem to be going anywhere. The invitation debacle threw wedding planning slightly off-course. I started to feel like I had so much left to do. By the end of the month, I wasn’t sleeping well and some daily activities that led to frustration even made me cry! I really committed to having 2-3 weeks before the wedding to relax. To do so, I buckled down and stuck to my To-Do list. I was able to get back on track, so by the end of September I was just about where I wanted to be with planning. The finish line was in the distance!

Overall, I actually didn’t think wedding planning was too stressful, but I did hit a few bumps in the road along the way. Towards the end, there were moments that certainly tested my patience. I’d wake up thinking about chipping away at my To-Do checklist.  I eventually made it through that rough period of time with 2-3 easy pre-wedding weeks, as planned! I have my checklist to thank for that. Organization is key in preventing wedding stress. I think having a plan and making daily goals are helpful in keeping wedding planning manageable.  It is important to remember to take a break when you need to and step back to soak it all in. It is such a special time in life that makes you appreciate and be grateful for all of your blessings. Try not to wish the time away! Go for a walk, get a mani/pedi, have a glass of wine or take a mental health day from work if you need to de-stress…happiness is key!

xo Miss Alyss

Butternut Squash Turkey Chili

Happy Monday! I haven’t been cooking much in the last week because my dad has been helping us with our recent kitchen mini-renovation. This weekend after finishing up the project, I was happy to get back to spending some time in the kitchen. I had most of the afternoon to cook, and I thought it would be a good day for chili. A few weeks ago, I made butternut squash chili that ended up tasting delicious. Although I’m always open-minded enough to try new recipes, I also enjoy crafting a go-to recipe to perfection. I  decided to give the butternut squash chili another attempt and was again satisfied with how the recipe turned out. I was able to be productive around the house while also keeping my eye on the stove, but I’m sure it would work well in a slow cooker as an easy meal during the week. In comparison to a traditional hot and spicy chili, this recipe is much more mild, rich and sweet. I’m beginning to think I may prefer this chili recipe over the traditional kind (at least during the fall)!

Screen Shot 2018-01-06 at 11.32.44 AM

Butternut Squash Turkey Chili

  • Servings: 4-6
  • Difficulty: easy
  • Print

Ingredients

1 lb Lean Turkey Chop Meat
28oz Tomato Sauce (unsalted)
16oz Frozen Butternut Squash (in cubes)
15.5oz Can of Black Beans, rinsed
8oz Frozen Corn Kernels
3 Bell Peppers, chopped
1 Small Onion, chopped
2 Cloves of Garlic, minced
2 TBSP Tomato Paste
1.5 TBSP Chili Powder
1 TBSP Corn Starch (optional)
1 Tsp Cinnamon
1 Tsp Salt
1/2 Tsp Oregano
1/4 Tsp Black

Directions


  • Brown turkey chop meat in Dutch oven (or a medium/large pot) over medium heat.
  • If you turkey renders a lot of fat, you should drain it now.
  • Add chopped onions and garlic cooking for about 10 minutes.
  • Add bell peppers (I prefer using red, yellow and orange peppers) and cook for 10-15 minutes then add dry seasonings (except corn starch).
  • Once the veggies are softened and the mixture is well coated in seasonings, add the tomato sauce, tomato paste and corn starch (which helps with thickening). You could also use diced tomatoes instead of sauce.
  • Bring to a boil then simmer for 30-60 minutes (depending on your stove you may want to switch you pot to a smaller burner to control the heat over a longer period of time).
  • Bring back to medium/low heat and add the black beans, frozen corn and butternut squash and cook for about 15-20 minutes. I find if you add these three ingredients too early, they will get mushy.
  • Taste before serving and add additional salt or other seasonings, if needed.

I really love my Le Creuset Dutch Oven. It is definitely an item that I consider to be a bit of a splurge, but it has become a staple in my kitchen. It is very versatile, so I honestly find myself getting a ton of use out of it. In the three months I’ve had it, I have used it to cook chili, sauce, chicken pot pie, soups and stew. It has been really easy to clean, but I do make an extra effort to follow the manufacture cleaning instructions to keep it in tip-top shape.

Disclaimer: I am a participant in the Amazon Services LLC Associates Program, an affiliate advertising program designed to provide a means for me to earn fees by linking to Amazon.com and affiliated sites. All opinions/recommendations are my own.

Screen Shot 2018-02-19 at 8.12.23 PM
post-signature-1