Engagement Party: Invites & Decor

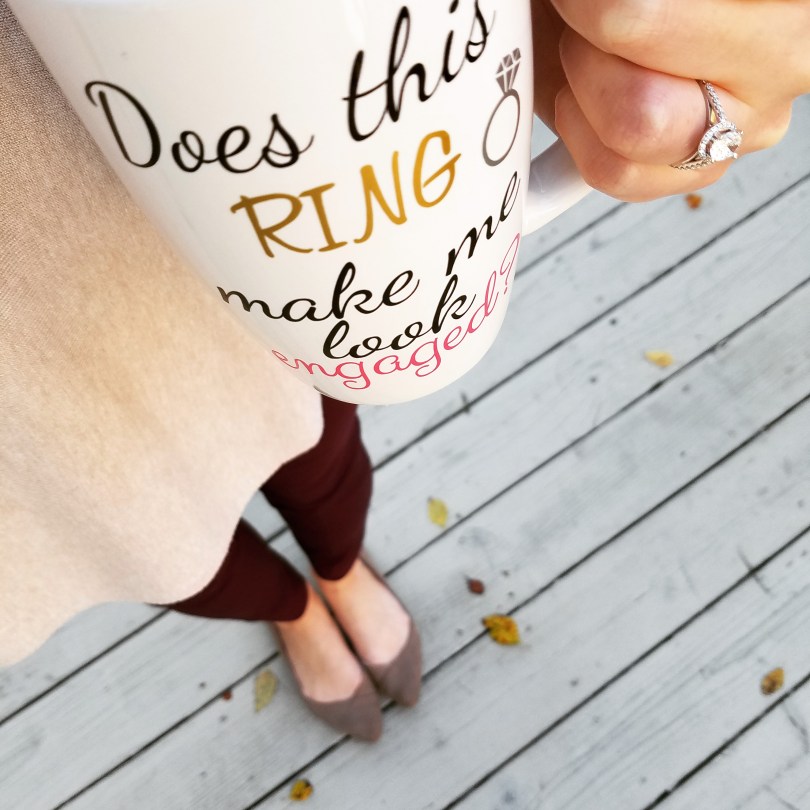
Hi there! Thanks for checking out my blog. This post is part of my wedding planning series. If you have not read my previous posts on my engagement ring and how I asked my bridesmaids to be part of my wedding day check them out here and here. I have been engaged for over a year now and can’t believe how quickly the time has gone by. It has truly been a special year! As my wedding gets closer I am getting more excited too. In this post I am sharing the details of our engagement party. We had so much fun celebrating with our closest friends and family!

Our parents threw us an engagement party at a great restaurant called Corks & Taps in Bayshore, NY.  It has a rustic meets industrial vibe which went perfect with the decor theme I had my heart set on. {More to come on how my wedding vision changed over the last year – stay tuned!} We lucked out with the most perfect fall day and were able to keep the giant front doors open for the entire party. The venue could not have been more perfect. The food was great, the staff was helpful and of course there were a ton of craft beer options on tap! I have to follow a gluten-free diet, so it is very important that the venue prepares everything gluten free. I am happy to say I had no problems with the food. All of our guests had great things to say about the venue.

DSC_2834
Photo by Annie Harris Photography

I ordered our invitations on Etsy which were perfectly coordinated with the beer and wine theme. The seller was very responsive via Etsy messages and turned around my order within 1-2 days. The invite was an instant download which I had printed and cut at Staples. I think the quality of the invites were great. Instant downloads are a way to incorporate affordable invites into your event.  There are so many invitation options on Etsy that you can definitely find one for any style or occasion.

DSC_2731
Photo by Annie Harris Photography

As I mentioned in my previous post I gave all of my bridesmaids custom wine glasses which they all brought to the party. My fiance and I also used our matching wine and beer glass set. All of the glasses made for some cute pictures!

DSC_2726
Photo by Annie Harris Photography

I have dreamed about getting married in the fall for as long as I can remember. That dream always included pumpkins. I painted a large pumpkin white with a gold stem and big “S” initial for my future last name.  It was super easy to make. I purchased the paint at a craft store and used a stencil to paint the “S.”

DSC_2723
Photo by Annie Harris Photography

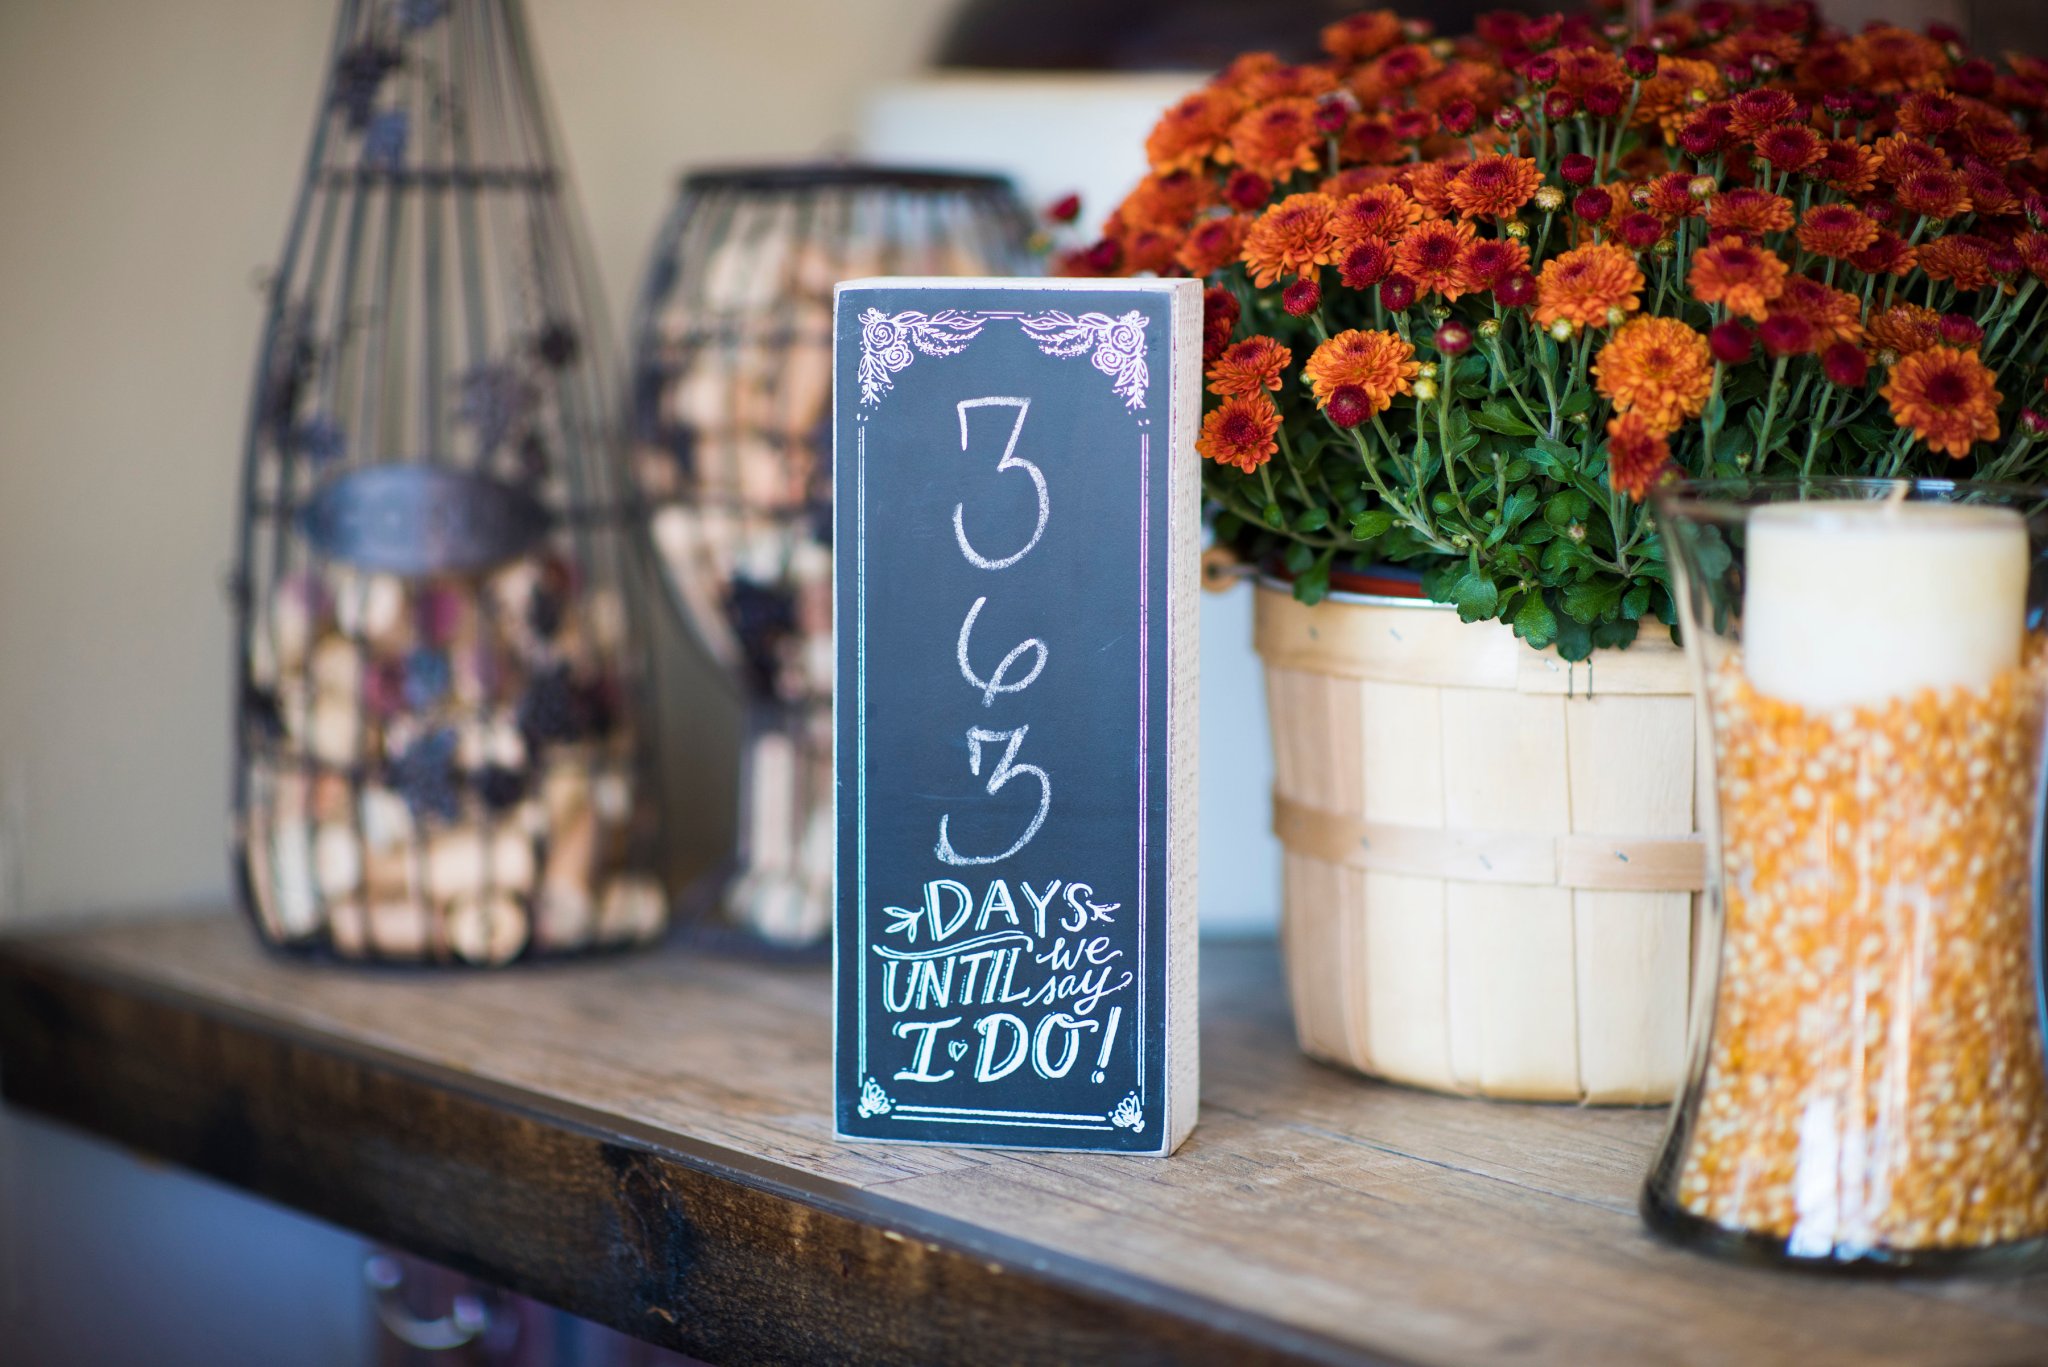
My mom purchased all different sized glass vases from the craft store which we filled with corn kernels and yummy scented fall candles. All of the women at the party loved them! These were all snatched up as we left that day. Since the party my mom has re-purposed these vases for all different holidays.

DSC_3036
Photo by Annie Harris Photography

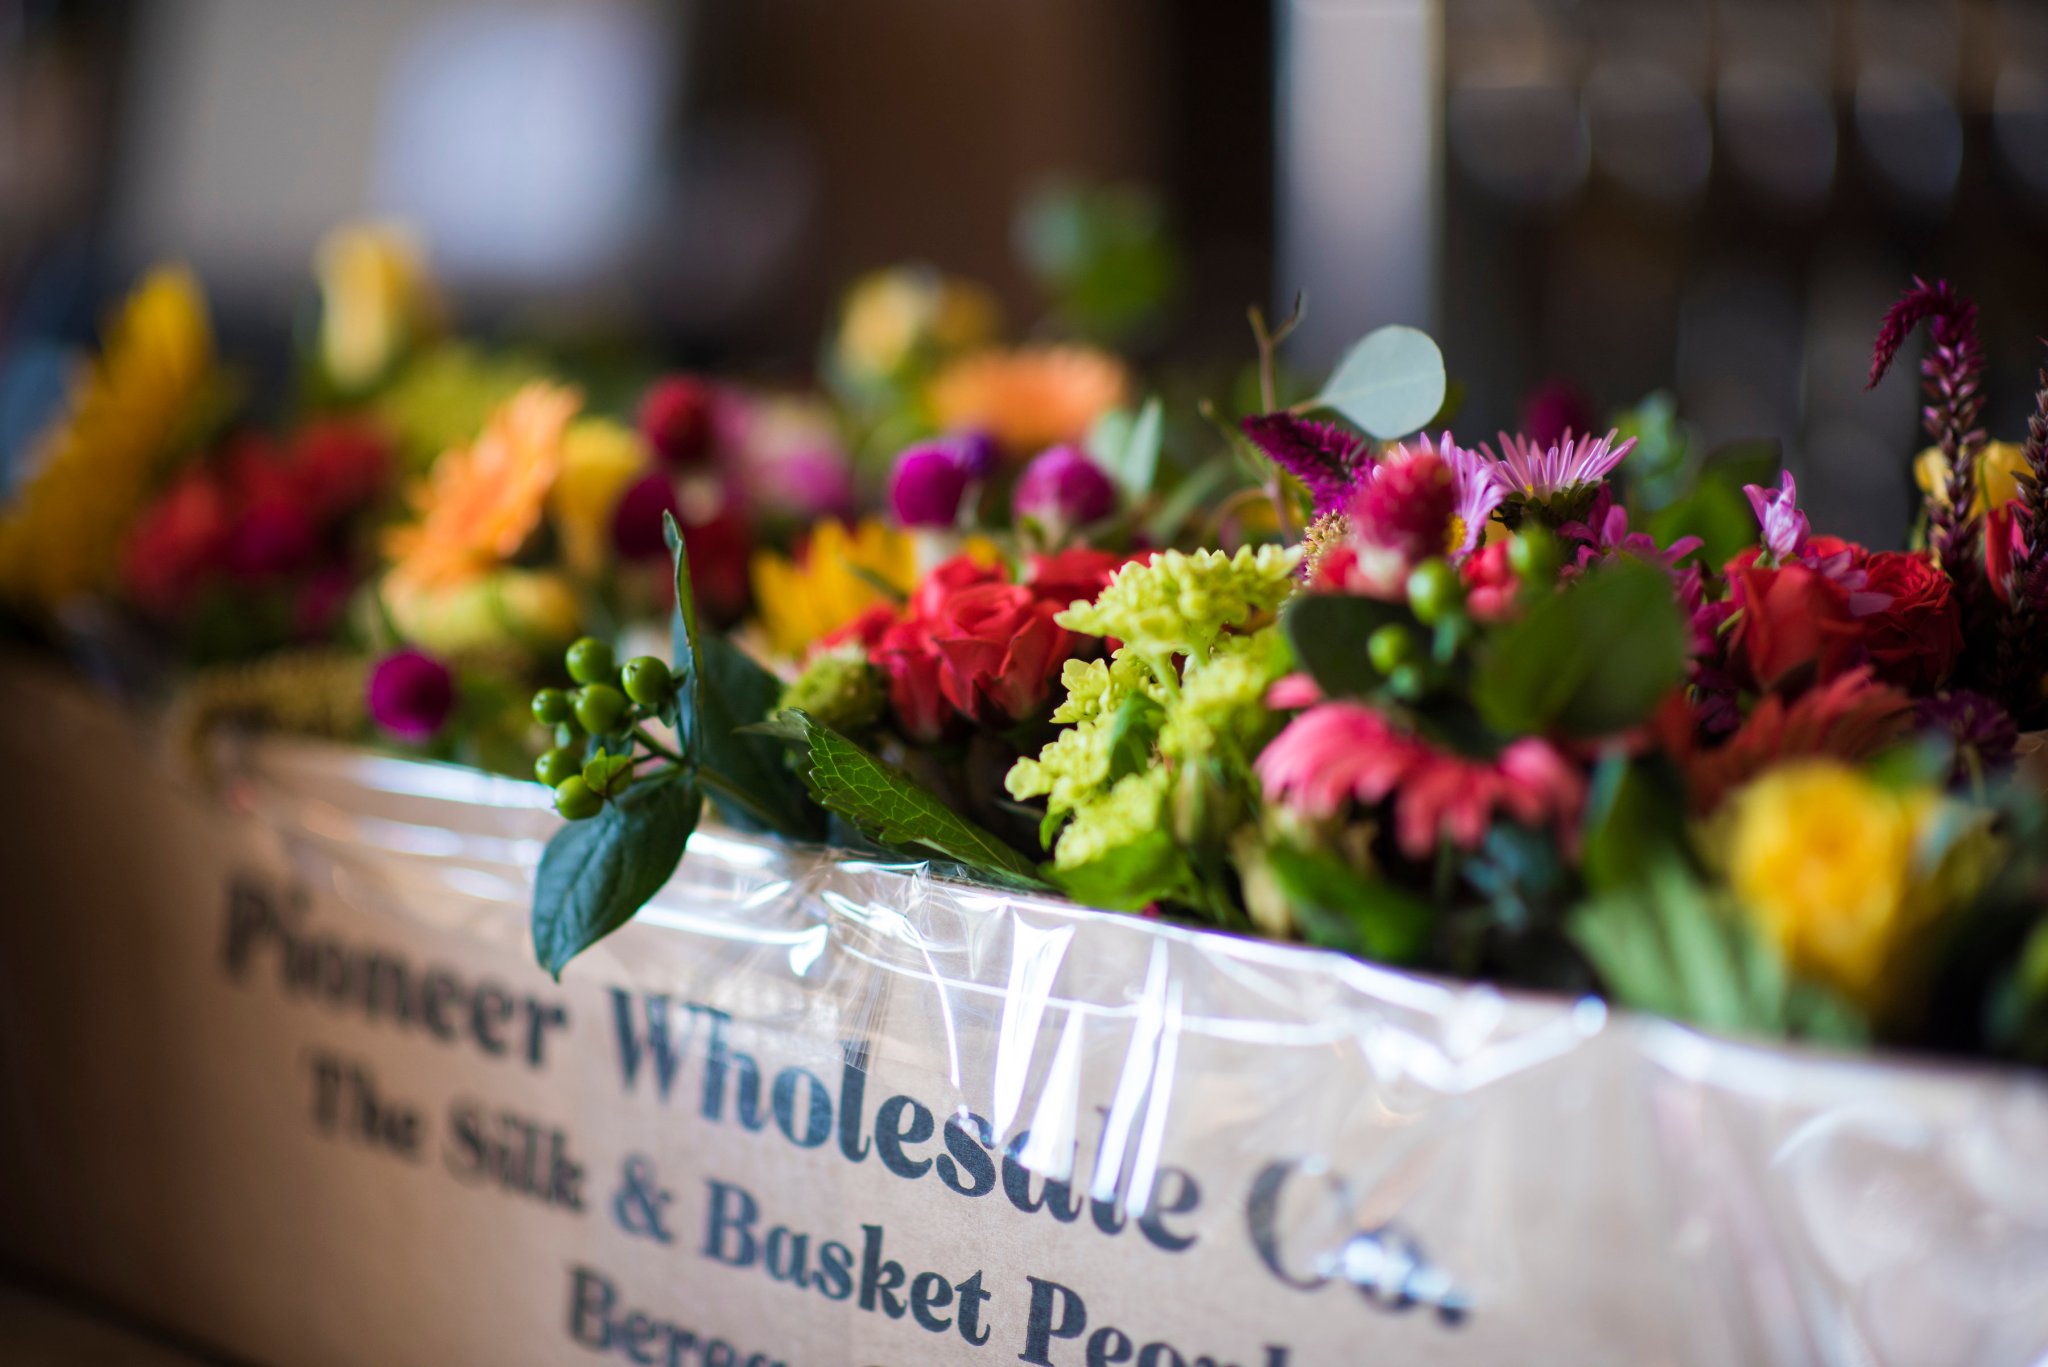
One of my most favorite decorations of the day were the painted mason jars my mom made. She used white chalkboard paint and gave them a rustic look by rubbing them down with sandpaper. A bunch of our guests also took these home because they loved them so much. My uncle is a wonderful florist and he filled the mason jars with the prettiest flowers. He is also the florist for my wedding day!

DSC_2724
Photo by Annie Harris Photography

My MOH gave me a Polaroid camera for my birthday, so I decided to use it at our engagement party to have our guests make a photo/guest book. The film cartridges are a little pricey, so I thought it would be a better idea to use the Polaroid camera at our engagement party versus our wedding (to use less film). I bought a square craft book at Michael’s Crafts that had blank pages. To attach the photos to the book I bought double sided scrap-booking tape that comes in a roller (similar to this one). I suggest using tape that comes in a dispenser over the little squares you have to peel off the tape roll because you don’t want little papers all over. At our party I left the Polaroid camera, the book, tape and some pretty milky gel pens on a table. I love how it turned out and every so often I take out the book to read through all of the notes our guests left us.

DSC_2717
Photo by Annie Harris Photography

I ordered custom signs from Designs by Kari on Etsy with our wedding hashtag, a message for the Polaroid table and a few other sayings. I opened a custom order request because the seller did not have all of the signs I wanted at the time. She was very responsive via Etsy messages and was able to create everything I wanted. I was so happy because I was having a hard time finding signs that I liked in the same colors and fonts. This order was also an instant download which I had printed at Staples. I found picture frames at Marshalls which also go nicely with my home decor so they were all easily re-purposed.

DSC_2716
Photo by Annie Harris Photography

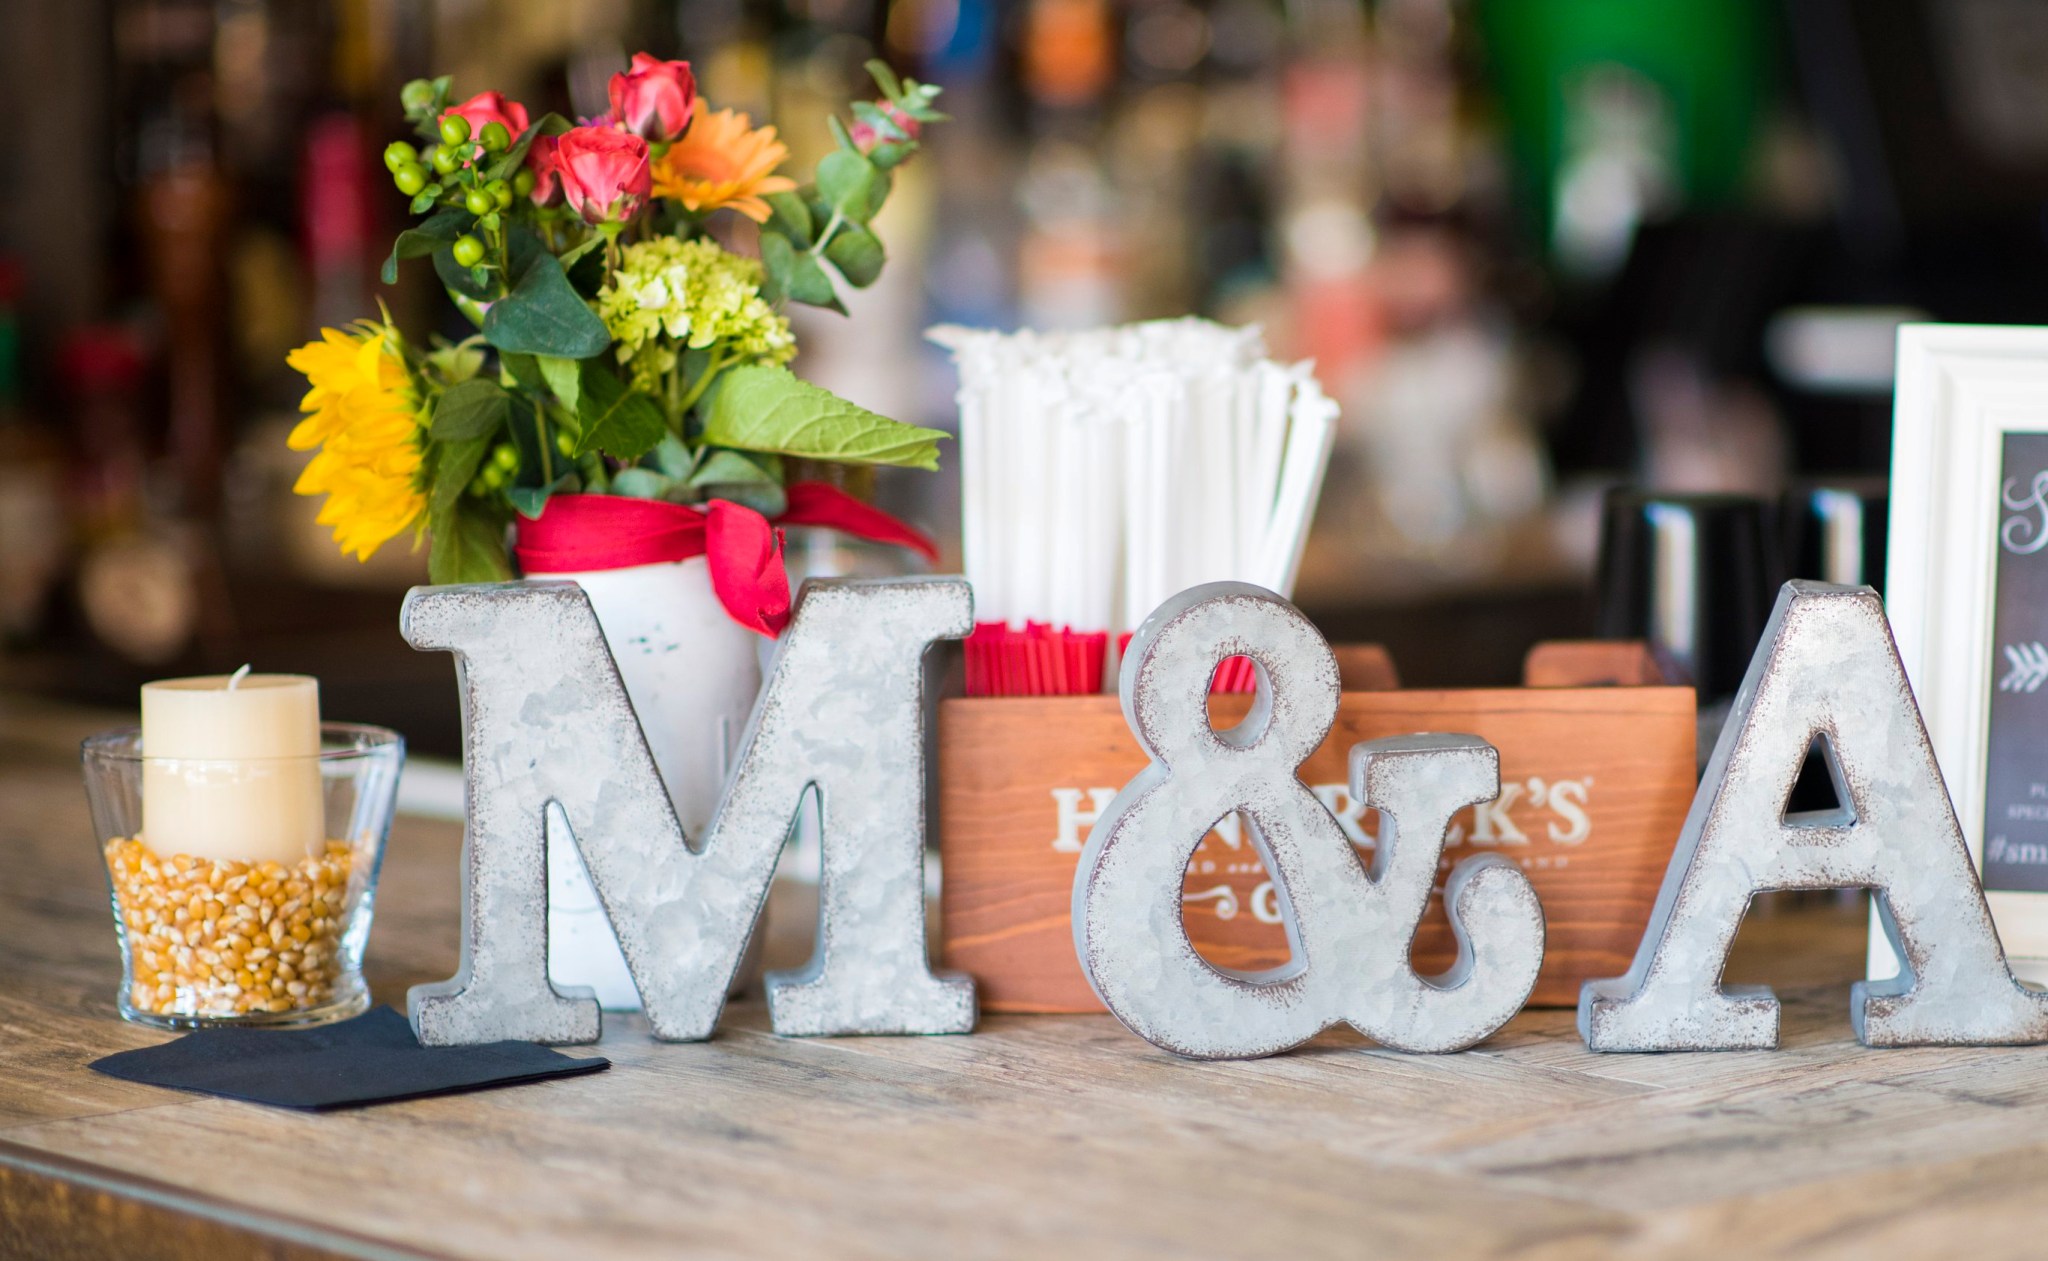
I found metal initials and an “&” sign at Michael’s Crafts which I left out on the bar with other decor. I also bought a few dark wood milk crates from Joanne’s Crafts which we used for our favors and pretty fall mums! Throughout the restaurant I also had some framed pictures of Mike and I. Some of my bridesmaids had given me gifts shortly after getting engaged and they doubled as great party decor! My MOH gave me an “engaged” banner with we used in pictures and I purchased a “love is sweet” banner that we hung over the fire place at the restaurant.

{Disclaimer: I am a participant in the Amazon Services LLC Associates Program, an affiliate advertising program designed to provide a means for me to earn fees by linking to Amazon.com and affiliated sites. All opinions/recommendations are my own.}

DSC_3051_1
Photo by Annie Harris Photography

Possibly my most favorite part of my engagement party decor were the favors! My mom is the best baker ever and she baked our favorite cookies. She uses Bob’s Redmill gluten free oatmeal to make her Monster Cookies gluten free too! I ordered paper bags and thank you stickers from Etsy. The bags of cookies looked so pretty in the wood milk crates, so they doubled as another decoration. We wrapped each cookie in plastic wrap and sealed the bags with the stickers.

post-signature-1

My Engagement Ring | Finding the Perfect Fit

Thanks for visiting my blog! I am trying to make more of an effort to blog regularly and have been considering adding a wedding planning section to my page too. I love reading tips from brides-to-be and would love to share some of mine as well. I decided to write this very long blog about the issues I’ve had with sizing my engagement ring. I have learned it happens to more brides than you would think. I have slim fingers, but my engagement ring finger knuckle is just big enough to be causing me sizing issues. Fear not my fellow brides, you are not alone and you will get your ring to fit!!


I was shocked when my fiance proposed we never had serious talks about the type of ring I wanted. He just knew that I wanted everything to be a surprise. I totally didn’t care how he popped the question! When he proposed we had been together for about 5.5 years, so in that time I had slipped him some ring ideas. If I sent him a photo, I would hope he at least glanced at it, but we never talked about it. I just crossed my fingers hoped that when the time came the proposal and the ring would be a perfect fit for me. With the help of a great jeweler he picked out the perfect diamond and setting for me. I have been in love with my ring from the second he slid it on my finger (and I realized it was an engagement ring and he wasn’t kidding…which took a few seconds). My ring is an oval diamond with a halo and pave band. I don’t know any of the specifics and I am happy to keep it that way.

Engagement Ring

I was so set on EVERYTHING being a surprise that I never had my left ring finger professionally sized. Towards the end of college I also stopped wearing rings all together, so I became unfamiliar with my true ring size. When my cousin got engaged a few years ago, I knew her ring was a 5.75 which seemed like a good fit for me too. Boy, was I wrong! I really wish I just took a random trip the a jeweler to be sized once I know my fiance was “the one.”

After a month of being engaged we went back to the jeweler to talk to her about re-sizing my ring. At that time my ring was flipping all around and I could slide it off easily. I actually started wrapping a Band-aid around the bottom of the ring to help keep it in place. This was the first time I experienced a jeweler’s perspective of how an engagement ring should fit. Jewelers want it to be very, very snug.  I was very nervous about having my ring made smaller. At a 5.75, it seemed so tiny already! That day the jeweler sized me at a 5.25 and was even swaying me to a 5, but I just thought it would be too tight. She also mentioned that due to my setting she wouldn’t be able to re-size my ring more than 1 size to protect the setting itself. When I got my ring back it fit and all was good.

Towards the end of year when the weather turned cool my ring started flipping around. It also took very little effort for me to slide it over my knuckle. Knowing that it wasn’t the dead of winter yet, I started to worry about my ring sliding off. It was so loose that I felt it could get caught in my pocket or a glove. I once again resorted to wrapping a Band-aid around the ring to help secure it. I was hoping I could make it through the winter with the ring as it was and decided what to do the following summer when I would pick out my wedding band.

After a few weeks of having my ring flipping around I stopped at a local jeweler to see if I could get a ring guard. The jeweler had a great reputation and is comparable to the jeweler who made my ring. She did not recommend a ring guard because the diamonds on my band come pretty far down and a ring guard could damage the setting around them. Instead she gave me a clear tape like ring guard to wrap around my finger to help secure my ring until I decided on a more permanent solution. After a few more weeks, I couldn’t take it any longer and decided to have ring balls soddered into my engagement ring. The balls were a good semi-permanent solution that would help re-size my ring, but they could be taken off in the future if needed.

My ring felt funny and very snug with the ring balls, but the jeweler said that’s how an engagement ring should fit and after a few days I wouldn’t notice the balls. Within a few hours I actually didn’t notice the ring balls. It was snug, but I could get it on in the morning and off at night. It was even still flipping around at times. After Christmas I noticed my ring was more snug than usual, but I didn’t think much of it until New Year’s Eve. I fell asleep on the couch for a few hours and when I woke up I could not get my ring off. Although I didn’t want to, I went to bed with it on, knowing my finger would only swell more while I was sleeping.

I woke up knowing that I shouldn’t try to take my ring off so I relaxed, had breakfast, drank a good amount of water and put an ice cube on my finger. I even watched TV with my hand above my head. Even though the ring wasn’t budging over my knuckle I was still able to spin it around the base of my finger. With ice, Windex, coconut oil and the Grace of God, I got my ring off, but it was VERY uncomfortable.

Once my ring was off, my knuckle was now noticeably swollen and throbbing. I immediately realized I probably should have left my ring on (for a few days if needed) until my knuckle swelling subsided. Forcing it off only made the situation worse. By that evening, I realized that a callus had formed around my knuckle from the pressure of my ring. Gross! Fortunately, I wasn’t as gross or noticeable as it sounds, but it was definitely preventing my ring from sliding on and off.

Over the course of three weeks I had my ring balls shaved down twice then had them removed entirely. I could get the ring on, but because of the callus getting my ring off was still very difficult. My finger was so sore! I decided to keep my ring off for an entire week to let all swelling subside. I called my dermatologist’s office to see what they would recommend. They suggested I liberally apply Aquaphor throughout the day and a thick layer at night with a band-aid. After a few days of lotion-ing up my hands constantly with Aquahor and Eucerin hand lotion my finger healed.

My ring fits the way it did after having it sized. It wiggles around and comes off with just a bit of effort. It’s not perfect and without a doubt is going to be bit annoying, but I am more comfortable this way. Now that I have experienced two extremes of ring sizing, I much rather it be spinning around a bit and not causing pain to my knuckle. This summer I will be picking out my wedding band which I plan to order in a size 5 and will decide if my engagement ring needs to be resized to a size 5 too.

My advice to fiances-to-be is to get your finger sized before you get engaged and when it comes to sizing, go with your gut. No one can decide how your ring should feel on your finger, but you.

Update 11/21/17: I am now married and wear my wedding band with my engagement ring. When I ordered my wedding band, I found out that my engagement ring was special ordered in a size 4.75 and was re-sized to a 4.25. I think it was a mistake on Mike or the jeweler’s part, but it worked in my favor. My ring was never a 5.75. It wouldn’t have even stayed on my hand if it was! My wedding band was also ordered in a 4.25. Together both rings fit more snug than alone, but there are some days I think I need a size 4. Overall, they fit fine and I love them. I have realized that my fingers fluctuate in size and some days my rings spin, and that’s okay!


Here are the at home “treatments” that I think helped me out the most to reduce swelling and get rid of the callus. I am not a doctor or any kind of=r medical professional. These are just the tricks that worked for me.

-Keep your ring off for at least 1 week (power through girl, I know that advice makes you want to cry!)

-To reduce swelling, try icing your knuckle a few times a day or soak your hand in warm water with epsom salt

– Wash your hands with an exfloiating cleanser (I used my Derma-E glycolic acid face cleanser for a gentle exflotiation)

-After soaking your finger or showering, lightly buff the callus with a gentle pumice stone

– Apply Aquahor ointment to the irritated area throughout the day

-Apply a good quality hand cream througough the day (I like Eucerin)

-At night apply vitamin E (straight from a vitamin E capsule) to the irriated area then apply aquaphor and a Band-aid

-Apply a fesh lemon peel around your knuckle and secure with a Band-aid. After a few hours remove it and gently buff with pumice stone then apply Aquaphor, vitamin E and hand cream.

-Breath! It will all be okay!

I hope this blog was helpful to anyone experiencing the same problem. Leave me a comment below to let me know or share your own experience. Would you like to read more engagement/wedding blogs? Let me know!

xo Miss Alyss