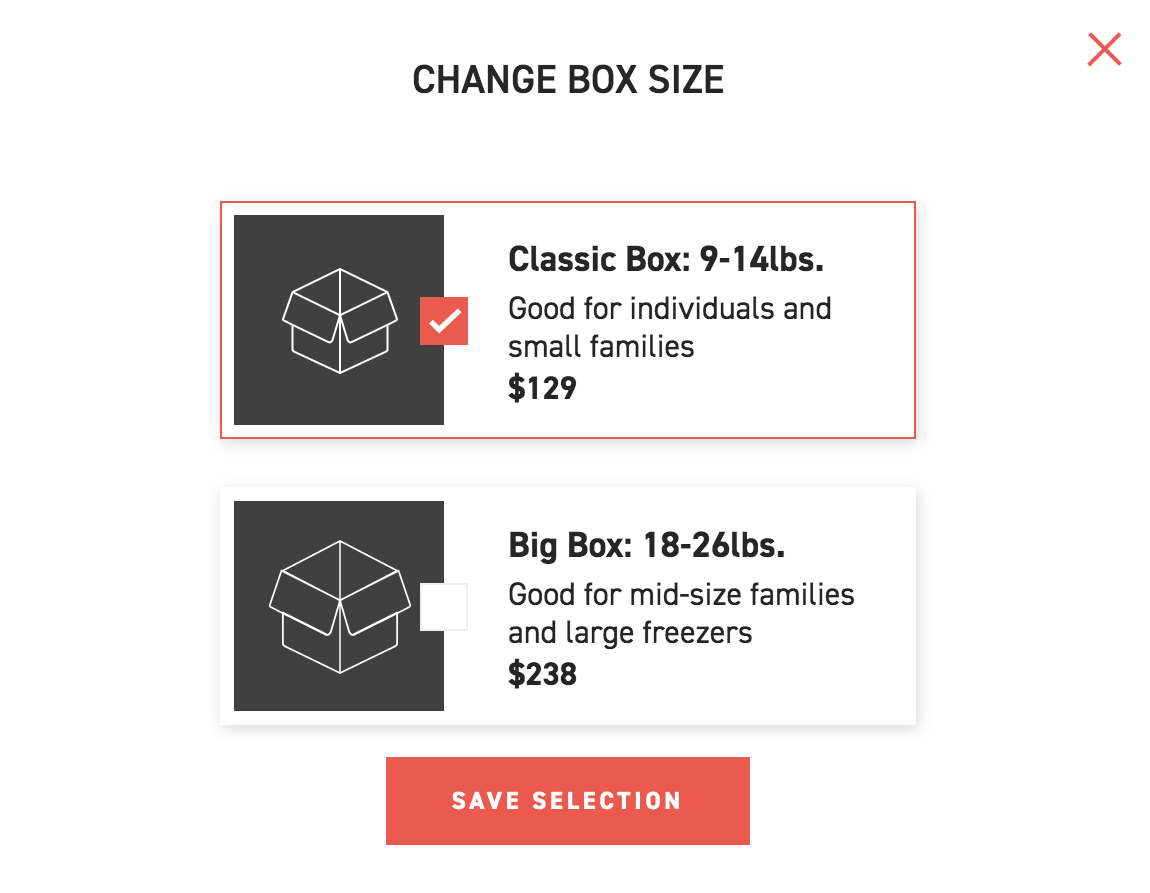
Updated: February 3, 2026
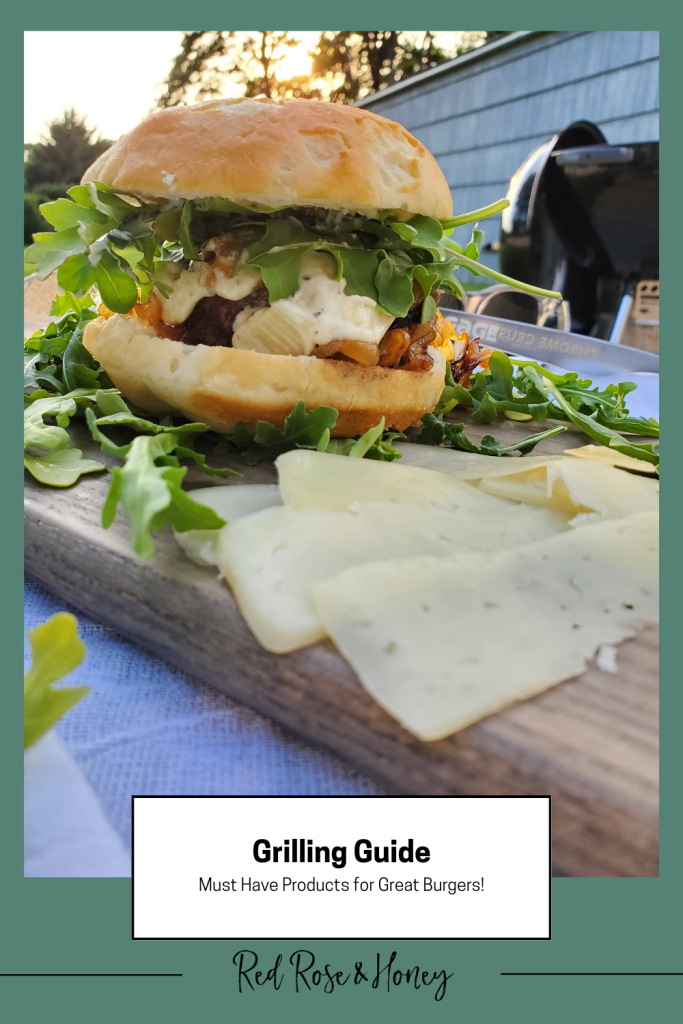
These gluten-free caramelized onion and Gruyère burgers are juicy, flavorful, and surprisingly easy to make at home. Made with simple ingredients, they’re perfect for a weeknight dinner or casual weekend meal.
As we gear up for summer, I think we all have BBQ season on our minds. I love a good cheeseburger, but week after week they can get a bit dull. My caramelized onion and Gruyere burgers are just what you need to kick your typical burger up a notch. This recipe will be sure to save you from burger burn-out, and bonus points – they’re easily gluten free!
First, let’s talk burger basics. Regardless of the recipe, I think the most important element is the beef itself. I personally am not a fan of pre-made burger patties. For the best burgers, my go-to choice is a high quality grass-feed beef. You need to start with a good base to create a delicious burger. Usually, a 1 lb package of beef yields three decent size burgers. After that, most of my burgers start the same; sea salt, black pepper, garlic powder and Worcestershire. Be sure to take your burgers out of the fridge at least 15 minutes before you’re ready to grill. If they’re super cold, the meat will tense up when it hits the heat.
Disclaimer: Product was provided by Gage Sunglasses in exchange for this post. This also post contains affiliate links. When you purchase an item through an affiliate link, I may earn a small commission. All opinions/recommendations are my own.
Next, you need to get to know your grill. We grilled our burgers on a charcoal grill for years. It took us a while to get use to, but we eventually mastered it with the help of fire starters. Although we still have our charcoal grill, we usually use a gas grill, which we just find to be easier. We have had the Weber Spirit E-315 for years and have no complaints.
To grill burgers medium or medium rare, our go-to method involves a temperature of about 500 degrees. Grill for 4 minutes on the first side and 3 minutes on the second side. Then, add the cheese for a final 30-45 seconds. When in doubt, check your burgers with a meat thermometer before serving. Cooking time will vary depending on the size of your burgers and heat of your grill. Want to shop some of my go-to grilling products? Shop here on LTK.
We’ve got the basics down. Now, let’s talk about the superstars that make these burgers great. They are the caramelized onions and garlic aioli. The caramelized onions on these burgers give them tons of extra flavor and give your meal a gourmet feel. When you plan to make this recipe, allow yourself extra time before dinner. Make the caramelized onions or prepare them ahead of time. Add some garlic aioli. It can be homemade or store bought. This will take the flavor up a notch. Then finish them off with a drizzle of balsamic vinegar and arugula. Serve it on a gluten-free bun (if that’s your thing) and you’ve got yourself an amazing dinner.
Ingredients You’ll Need:
- Ground beef
- Garlic powder, sea salt and black pepper
- Olive oil, Worcestershire sauce and balsamic vinegar
- Gruyere cheese
- Yellow onions
- Brown sugar
- Arugula
- Gluten-free burger buns
- Mayo, fresh garlic, olive oil
Tips:
- Let burger patties sit on the counter for 15 minute before
- Use a high quality beef and make your own patties
- Make caramelized onions ahead of time
- Master your grill


Caramelized Onion & Gruyere Burgers
This recipe is inspired by a favorite burger of mine from Cow Pig Bun in Maui. Enjoy!
Ingredients
- Caramelized Onions
- 1 large yellow onion
- 1 tbsp olive oil
- 1/8 tsp sea salt
- 1/8 tsp dark brown sugar
- 1lb grass-fed beef
- 1/2 tsp garlic powder
- 1/2 tsp sea salt
- 1/2 tsp black pepper
- 1/4 lb Gruyere Cheese
- Worcestershire sauce
- Balsamic Vinegar
- Arugula
- Burger Buns
- 1/4 C mayonaise
- 5 cloves of fresh garlic
- 2 tsp olive oil
- 1/8 tsp Black pepper
- 3 dashes of Worcestershire sauce
Burgers
Garlic Aioli
Directions
- Caramelized Onions
- Slice onions into rings (not too thin – they need to cook for a while)
- Pre-heat extra virgin olive oil in a sauté pan over med/low heat for about 2 minutes.
- Add onions to olive and stir,
- Once onions are translucent add 1/8 tsp of dark brown sugar and a sprinkle of sea salt.
- Stir occasionally until onions caramelize; 30-45 minutes.
- Pre-heat grill to 500° (F)
- While the onions are cooking, prep your burgers. Use 1lb of ground beef to form 3-4 equal patties (I usually use 1lb for3 patties).
- Add salt, pepper, garlic powder and Worcestershire to each side.
- Use your thumb to indent the center of each burger, about halfway into each burger. This helps prevent the burger from puffing up when it’s on the grill.
- If you’re not ready to grill, place the uncooked burgers in the fridge. Remove them from the fridge about 15 minutes before you plan to put them on the grill.
- For a warm or toasted bun, place a bun directly on the grill or wrapped in foil over in-direct heat.
- For medium/medium rare burgers, cook burgers over direct heat for 4 minutes on one side then 3 minutes on the other side. Cook time will vary depending on the side of your burgers and temperature of your grill.
- Add cheese 30-45 seconds before time is up.
- Spread garlic aioli onto each side of your bun then add cooked cheese burger to the bottom bun.
- Top if off with cartelized onions, arugula and a drizzle of balsamic vinegar.
- Heat oil in a small pan over low heat.
- Use a micro plain (small citrus zester or cheese grater) to finely grate fresh garlic.
- Add garlic to the oil and sauté for 3-5 minutes. The garlic will we fragrant. Keep an eye on it, you do not want it to burn.
- Combine garlic, oil, black pepper and Worcestershire with mayo in a small bowl
Burgers
Garlic Aioli

About Gage Sunglasses: This post was originally brought to you in collaboration with Gage Sunglasses. If you’ve read some of my blogs, it should be no surprise that I love living on Long Island. We are surrounded by the most beautiful scenery from beaches to vineyards. Among the beauty, you can find many small businesses thriving on that Long Island energy. One of them is Gage Sunglasses. I discovered Gage a few years ago and quickly snagged a pair for my husband. Gage was founded in 2015 on Long Island and makes high quality, comfortable and affordable sunglasses. They are available in many different frame styles and colors.