Gluten-Free Italian Chicken Meatballs

Good morning blog friends! Have you all recovered from this last snow storm? I still can’t believe how much snow we woke up to on Thursday. I would imagine the weathermen were thanking their lucky stars that the storm actually happened and their predictions weren’t a total flop. Although the last snow fall did make our neighborhood look like a winter wonder land, I am definitely ready for spring. Bring on the backyard BBQs and grilling for dinner!

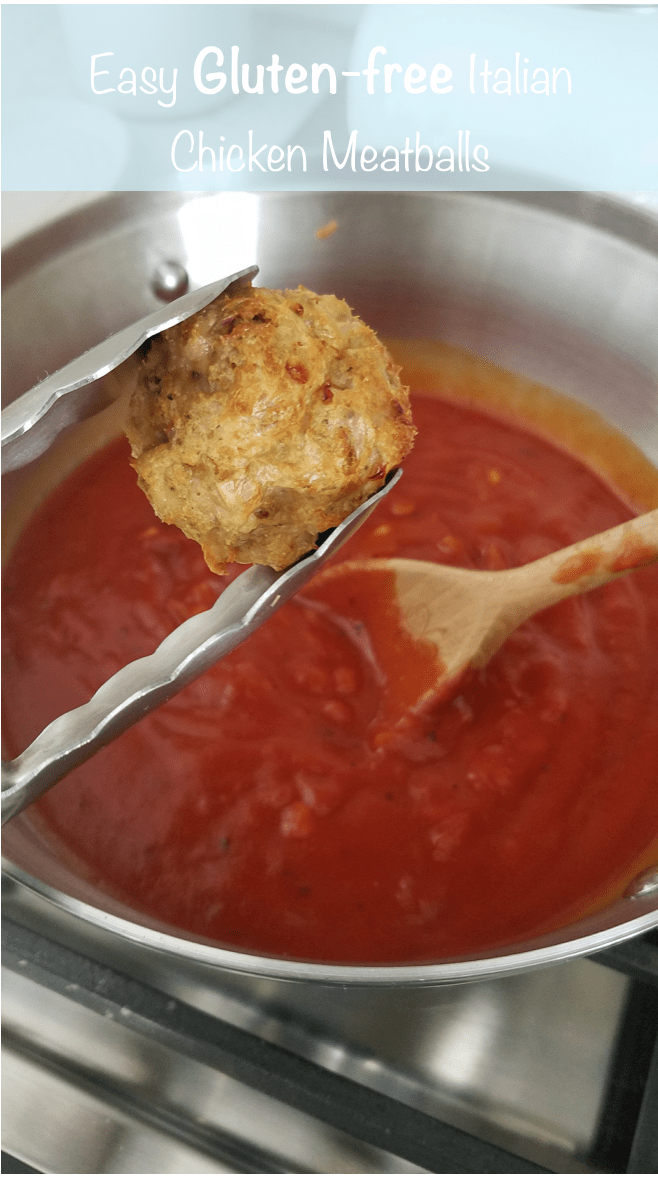
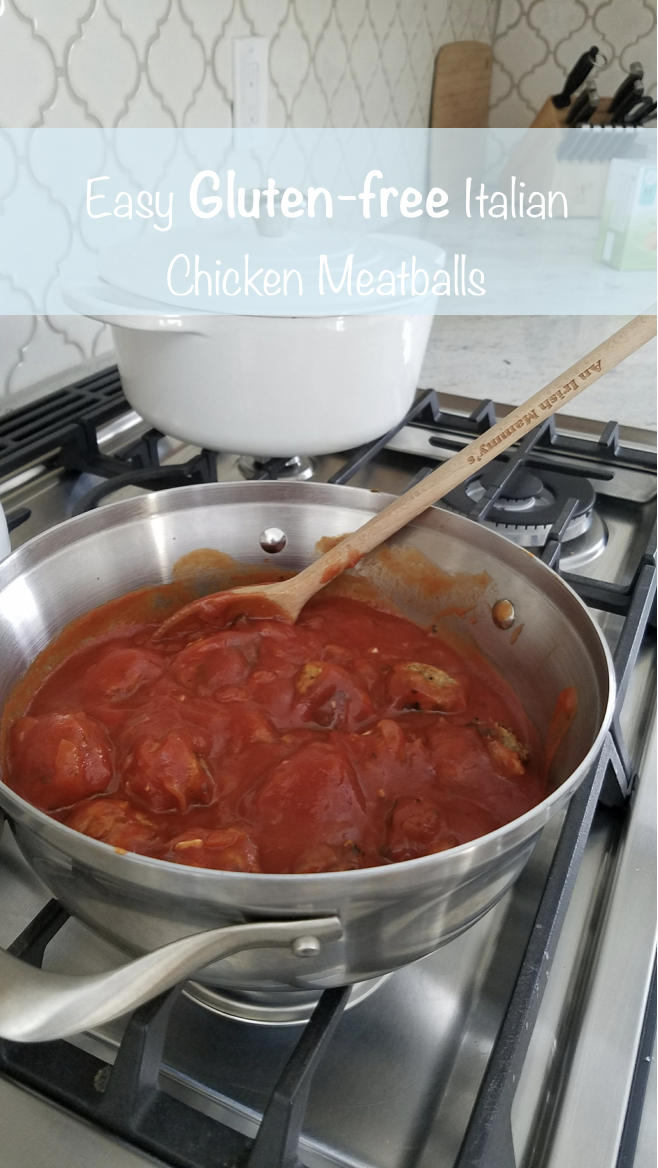
Today I wanted to share a recipe that goes perfect with last week’s post. Along with knowing a basic sauce recipe I think you all should know how to make tasty meatballs. This isn’t quite a traditional recipe as most are made with beef. My mom usually makes hers with a combination of ground beef, pork and veal. My recipe is a little lighter made with ground chicken. If you are gluten-free make sure to always check the ingredients in your meat and poultry. It is not uncommon for gluten to be hidden in the ingredients.

Screen Shot 2018-03-22 at 9.43.18 AM

This recipe is so easy to put together {even on busy week nights} because there is not much to it. Combine all of the ingredients in a bowl, form meatballs and bake! Don’t forget that when you’re cooking poultry it’s super important to make sure it is cooked to a safe temperature, so be sure to use a cooking thermometer to check before serving. I have this one and the cover lists the required cooking temperatures for meat, pork and poultry which comes in handy.

Screen Shot 2018-03-22 at 9.43.56 AM
Screen Shot 2018-03-22 at 9.44.34 AM

Chicken Meatballs

  • Servings: 2-4
  • Print

Ingredients

  • 1 lb Chicken Chop Meat
  • 1/4 cup Gluten-Free Italian Bread Crumbs
  • 1/4 cup Grated Pecorino Romano or Parmesan Cheese
  • 1 Egg
  • 1 Small Shallot or Onion
  • 2 Cloves of Garlic
  • 1/2 Tsp Salt
  • 1/4 Tsp Black Pepper

Directions

  • Preheat oven to 350 degrees and line baking sheets with parchment paper
  • In a large bowl combine all ingredients, but do not over mix. Over mixing the ingredients can cause the meatballs to be tough. If the mixture seems very wet, add an additional 1/8-1/4 cup of bread crumbs.
  • Form the mixture into balls (again, don’t over work the meat) and place on baking sheet
  • The size of your meatballs will alter the cooking time. Plan to bake for 25-30 minutes on convection (if your oven doesn’t have that setting, bake for longer) then broil on high for about 5 minutes.
  • Use a meat thermometer to check temperature to ensure chicken is cooked to a safe temperature.
post-signature-1

Classic Marinara Sauce for Two!

Hi blog friends! Thanks for stopping by again. Today, I want to share a quick and simple recipe that I think everyone should know how to make — Marinara Sauce! This sauce can be served with pasta, meatballs, on pizza, eggplant parm, chicken parm and so much more. I use this recipe as a base to all red sauces I make too. Like many of the dishes I make, this one starts with olive oil, garlic and onions. I really believe that if you always have these three ingredients, you can whip up a tasty meal with whatever else you have in your kitchen.

Screen Shot 2018-02-23 at 10.42.10 PM

Tea Kettle / Stand Mixer / Spoon Rest (similar)/ Pot/ Mason Jar (similar)/ Backsplash

I first started making my own sauce my junior year of college. I could often be found making a pot of sauce and baked ziti before my 8am class. Although I didn’t do very much meal prep in college, I did find it easy to make a head some dinner here and there so I could heat them up quickly after late classes. A girls’ gotta eat, right?

One of my first blogs ever was about my homemade sauce {check it out here} and reading that blog now is kind of funny. In that post I mention that oregano was my least favorite dried seasoning, but now I would say that I love oregano and don’t care for parsley. Sometimes I even leave parsley out. I also find it really funny that I mentioned I was making Mike {who is now my husband} strawberry shortcakes with homemade whip cream. He was the pickiest eater in college! I totally forgot that there was a time he ‘hated’ strawberries until I re-read that blog. Boy have times changed!

Now that I’ve taken you on a trip down memory lane, let’s get back to my current recipe! Although I haven’t changed much since I first started making sauce there is one change that I think was for the better. I almost always add very finely chopped or grated carrots. Carrots really cut down on the acidity of red sauce. I am a bit prone to heartburn and acid reflux. I have found that when I add carrots to my sauce it is much less likely upset my stomach. If you’re in the same boat, I definitely suggest you give carrots a try!

Disclaimer: I am participant in the Amazon Services LLC Associates Program, an affiliate advertising program designed to provide a means for me to earn fees by linking to Amazon.com and affiliated sites. All opinions/recommendations are my own.

Classic Marinara Sauce

  • Servings: 2-4
  • Difficulty: easy
  • Print

Ingredients

1 tbsp extra virgin olive oil
1 small onion, finely diced
2-3 small garlic cloves, finely minced
2-3 tbsp carrot, finely grated
14.5oz can petite diced tomatoes, unsalted*
8oz can tomato sauce, unsalted*
1 tbsp tomato paste
1 tsp salt (more to taste)
1/2 tsp dried basil
1/2 tsp dried oregano
1/4 tsp dried parsley
1/4 tsp black pepper
*Can substitute 1 28oz can of unsalted tomato sauce/puree

Directions

-Saute onions in olive oil over medium/low heat until they’re fragrant and translucent, about 5-7 minutes
-Add carrots and saute for another 5-7 minutes
-Add garlic and sautee for about 3 minutes
-Stir in diced tomatoes, tomato sauce, tomato paste and seasonings
-Once sauce starts to bubble, bring down to a simmer for 30 minutes or up to two hours.
post-signature-1

Gluten-free Irish Soda Bread

St. Patrick’s Day is a few days away and I am beyond excited to share my gluten-free Irish soda bread recipe. If you follow me on Instagram, you may know that I have been testing out this recipe for weeks. I set a goal for myself to share this recipe in time for St. Paddy’s day. After many failed attempts, I was definitely getting discouraged. I swear I was close to tears this past Sunday when I finally got this recipe right. I am so proud of it. I called my mom right away with a mouth full of bread.

Screen Shot 2018-03-13 at 10.21.49 PM

Irish Soda Bread is supposed to an easy, throw together recipe. Its made of a few simple ingredients that were considered common in Irish households when this bread first came to be. I also learned that traditional Irish soda bread is plain – no raisins! Now that I got my recipe down pat, I do think it is pretty simple, but I am not sure how common it is to find buttermilk in someone’s fridge.

I haven’t had Irish soda bread in about 7 years, so I wasn’t sure what it should taste like. I started off with Ina Garten’s Irish Soda Bread recipe {substituting all purpose flour for GF flour} and it did not turn out well. Ina is amazing, so I am sure her recipe turns out great with regular all-purpose flour. I also tried a recipe that I received from someone who came to my bridal shower. I am all for experimenting when I am cooking, but doing the same with baking was a big challenge. This was also my first attempt ever at Irish soda bread.

My first few attempts lead to very dense bread that hardly resembled Irish soda bread. I wasn’t sure if it was due to my oven {which is gas}, the flour or my technique. I first noticed improvements when I chilled the butter, buttermilk and egg. Next, I saw improvement the longer I chilled the dough before baking. But the biggest improvement came from my choice of flours. King Arthur’s Measure for Measure flour was a game changer! I highly recommend using this flour for my recipe. It totally changed the texture of my bread.

I had been using Bob’s Redmill 1:1 flour {which has worked great in other recipes} but I found that it was what cause my bread to be dense and not bake evenly. I changed up the baking temperature and bake time, but it never seemed to bake correctly. Regardless of the flour this bread bakes with a lot of cracks, so I didn’t find it necessary to score the dough with an “x” before baking it {I tried that too}.

If you try my recipe, I would love to know! Please leave a comment below or on my Instagram @redroseandhoney.

Disclaimer: I am participant in the Amazon Services LLC Associates Program, an affiliate advertising program designed to provide a means for me to earn fees by linking to Amazon.com and affiliated sites. All opinions/recommendations are my own.

Screen Shot 2018-03-13 at 10.23.02 PM
Screen Shot 2018-03-13 at 10.22.21 PM

Gluten-free Irish Soda Bread

  • Difficulty: easy
  • Print

Ingredients

1 cup butter milk (very cold)
1 egg (very cold)
2 tbsp unsalted butter, cubed (very cold)
2 cups gluten-free flour blend
1/8 cup coconut sugar
5/8 tsp baking soda
3/4 tsp salt
1/2 cup raisins

Directions

– Dice butter into small cubes (about 1/4 inch) and place in a small bowl.
– Beat egg in buttermilk with a fork.
– Place in butter and buttermilk mixture in the freezer for about 10 minutes to chill while you prepare dry ingredients. Do not let it freeze!
– In a stand mixer combine dry ingredients on low speed, adding raisins last.
– Slowly added buttermilk mixture and butter on low speed. Combine well, but don’t over mix. Dough should be sticky.
– Turn dough out onto floured surface (flour your hands too), lightly kneading dough to form a ball. Do not score with “x”
– Chill dough in fridge for at least 1 hour.
– Pre-heat oven to 400 degrees.
– Once oven is ready, place dough on a parchment lined baking sheet and place in oven.
– Bake for 20 minutes at 400 degrees then turn heat down to 350, baking for another 30 minutes.
– Test bread with toothpick. Once it comes out clean, allow bread to cool slightly then transfer to cooling rack. Allow bread to cool for at least an hour before cutting.
– Serve plain, with powdered sugar or with Irish butter.
post-signature-1