Chorizo Breakfast Skillet | Inspired by The Vig Chicago

Earlier this year I visited family in Chicago. I was so happy to finally make it out there to spend some time with them and check out the place they currently call home. The trip was extra special because I met their sweet baby girl for the first time. One restaurant we went to for lunch was The Vig.  You can read my review of their restaurant on their press page {ahh – so cool!}. The restaurant is on the large side with makes it a great choice for special occasions. On the day we were there, I noticed a few groups celebrating birthdays and bachelorette parties. I ordered the mini chorizo breakfast skillet with potatoes, a fried egg, pico and a habanero sauce. IT WAS AWESOME. Since this trip, I have been thinking about this dish on repeat. A few weeks ago I finally pulled the trigger and bought the ingredients. I think my remake was just as good as the original. I whipped up this skillet for a special breakfast when one of our friends from college visited for a weekend.

I think what really appealed to be about this dish was that the sausage was crumbled. It was packed with flavor and I got a taste of spicy sausage with every bite. My local grocery store {btw I actually call it the food store} didn’t have fresh chorizo sausage, so I opted for organic pre-cooked chicken chorizo breakfast sausage. Full disclosure, I did not realize it was pre-cooked until I got home.

Screen Shot 2018-08-16 at 10.08.51 PM.png

I cut mini potatoes into quarters and seasoned them with olive oil, salt, pepper and paprika. I love well salted, crisp baked potatoes that you can just pop in your mouth. The potatoes baked at 375 degrees for about 30 minutes. I warmed up the sausage in the skillet then diced it into very small pieces. Next, I returned the sausage to the skillet to try to get it a bit crisp while the potatoes continued baking. Once the potatoes and sausage were done, I combined them in the skillet and mixed well.

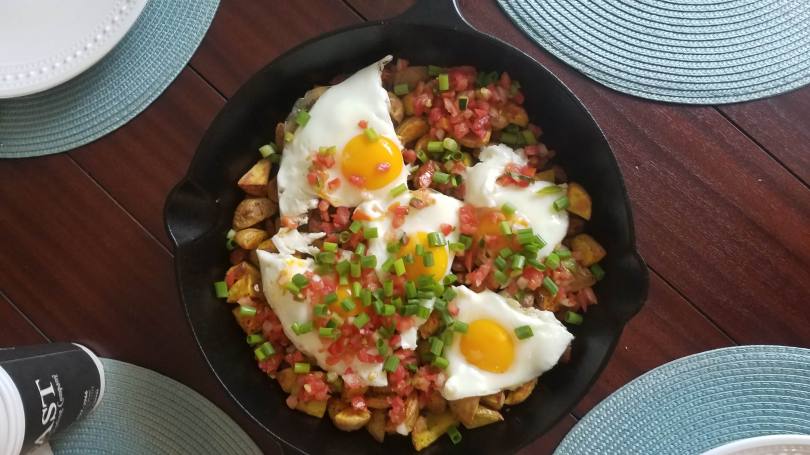
Next, up – the eggs! I cracked five organic eggs over the top of the potato-chorizo mixture and placed a lid over the top to cook them through. I love breakfast food; especially perfectly cooked eggs with a thick runny yolk.

To finish up the dish,  garnished it with fresh pico, green onions and put a bottle of Chulula’s on the table. I totally forgot about he habanero sauce, but this dish turned out delicious without it.

post-signature-1

Overnight Oats with Almond Butter

Until about a year and a half ago, I was a major morning person. I had no trouble waking up early for work or extra early to exercise. Last year when we bought our house my normal routine got pushed to the side and I found my mornings slipping away {along with my yoga practice}. I am really trying to make an effort to get back into a good morning routine. My mornings always run more smoothly when I prep the night before. On an ideal night, I will have my outfit ready and lunch packed which leaves plenty of time for yoga {or extra coffee} in the morning. Another great way to save time in the morning is to prep breakfast ahead of time. Overnight oats are such a time saver! Today I am sharing my favorite overnight oat combo.

Oatmeal is hands down my favorite breakfast food and quite possibly one of my favorite foods of all time. It is very filling because it’s loaded fiber. I usually avoid instant oatmeal packets {except when traveling} because they’re loaded with sugar. Old fashion oats don’t take too long to make and can be jazzed up with tasty, healthy toppings. For a long time I made my oatmeal totally on the stove. I combine 1/4 cup dry oats with 1/2 cup of almond milk and my favorite toppings {sometimes I will make a larger portion and will increase the amount of liquid proportionally}. Then cook over low heat, for about 10-12 minutes, until the oats were soft and all the ingredients were well combined. The key to great oatmeal is measuring the dry oats and milk, the oatmeal isn’t too thick or liquidy.

My breakfast life changed about two years ago when I started making overnight oatmeal.  After following the Acid Reflux Diet from The 30 Day Heartburn Solution I learned that soaked oats are easier for the body to digest. Letting oats soak overnight allows them to soak up all of the flavors from the other ingredients too. This method also allows for quick cook time when you’re ready to eat {or you can eat them cold}. My oatmeal always consists of 3 main ingredients – oats, almond milk, cinnamon. I switch up my toppings and occasionally add1 TBSP Flax Seed Meal or Ground Flax Seed. You can make 1 jar at a time or a few so you are ready for the week. My favorite combo is almond butter and banana! Here is what you will need to make my favorite gluten-free overnight oatmeal.

Screen Shot 2018-01-08 at 7.43.28 AM.png

Ingredients

-1/4 cup Gluten-Free* Dry Oatmeal

-1/2 Cup Unsweetened Vanilla Almond Milk

-1/2 TSP Ground Cinnamon (or just a sprinkle)

-1 TBSP Almond Butter

-1/2 Medium Banana, sliced

Screen Shot 2018-01-08 at 7.47.11 AM

Directions

In a mason jar combine oats, almond milk, cinnamon sliced banana and flax (optional). Cover with lid and shake the jar. That’s it! Now refrigerate you jar over night for at least 12 hours. (Disclaimer: For a last minute lunch idea, I have made these oats in the morning and let them sit about 4 or 5 hours until lunch. They still taste great, just not quite as good).

Screen Shot 2018-01-08 at 7.40.17 AM

When you’re ready to eat your overnight oats top them with almond butter. You can eat them cold, put the jar in the microwave for 1.5 minutes (if you used a microwave safe jar) or pour your oats into a pot and heat on the stove until warm. If I heat them up on the stove, I pour them right back into the mason jar.

MaraNatha is my favorite almond butter of all time!

*Not all oatmeal is gluten-free. Oats that are grown and processed with wheat, barley and rye grains are contaminated with gluten. Be sure to buy oats that are marked gluten-free.

xo Miss Alyss

Gluten Free Strawberry Scones

I am not much of a baker mostly because I don’t like to measure when I am cooking. Baking itself isn’t that easy. Gluten-free baking is often mission impossible. For a variety of reason that Alton Brown could probably explain much better than me gluten-free flours don’t behave the same way as traditional flours. Gluten-free baking can easily turn into a science project as you mix different flours and starches to get the perfect blend. For those of us who are less inclined to be scientists in the kitchen Bob’s Redmill and King Arthur now have gluten-free flour blends that can be more easily substituted in “normal” recipes. I have used both and feel that each work best in different recipes, so trial and error is the best approach when choosing between them.

Screen Shot 2018-01-06 at 10.16.47 AM

Last summer my fiance and I went on an amazing trip to Ireland {I’m very behind on that travel blog}. While were there I was pleasantly surprised by how aware the country was of food allergies in general; not even just gluten. We ate so many scones in Ireland. Yes, gluten-free scones! While we were there we talked about how once we were settled in our new house I would make us scones and we could reminisce about our trip. Last week I decided it was time to give it a try.

On the weekends I love watching Food Network and The Cooking Channel in the morning. It’s really the only time that “real” cooking shows are on. I love watching Ina Garten {anyone else excited about her new series?!} so I decided to go with her Strawberry Scone recipe. I used King Arthur’s Measure for Measure flour and reduced the recipe to 1 stick of butter.

If you have been following my wedding blogs or Instagram you may know that I am a soon-to-be-bride and a new homeowner! We have been in our house for a few months, but I have resisted buying any major kitchen items because I will be having a bridal shower. That being said I do not have the standard kitchen equipment normally required to make scones. To my surprise the scones turned out pretty good even though I don’t have an electric mixer, measuring spoons, egg wash brush or a rolling pin. But I must admit, I am really looking forward to my bridal shower and filling my kitchen with all of the awesome things I picked out!

Using my mini-food processor I cut the butter into the flour in batches and mixed all of the ingredients by hand. I combined the dough into a ball and on a floured cookie sheet lined with parchment paper I worked the dough into a disk. I picked up a trick from a Martha Stewart show that helps keep your parchment paper in place. You can use small binder clips to secure it to the cookie sheet.

Overall I would consider this recipe a success, but it could use a few tweaks. The scones were a bit bland, so next time I may add more sugar or powdered sugar after they’re baked. They were also a bit dense which is most likely due to the gluten-free flour. Next time I would try another brand and also bump up the amount of strawberries.