EASY Appetizer for Football Sunday!

With NFL playoffs this weekend, I thought it would be a good day to share a great game-day app. It’s one of the easiest appetizers I have ever made. You can prep most of the ingredients ahead of time which makes them perfect for parties. Pop them in the oven when your guests arrive and in 30 minutes you’ll have a great snack ready. to eat I actually made these one Christmas Eve and my family really liked them. Be warned – jalapenos can be very hot, so be mindful of the seeds. Heat is not for everyone. These so easy that you don’t really need to follow a recipe.  Here is super easy spin on loaded potato skins!

Need more game day ideas? Follow me on Pinterest!

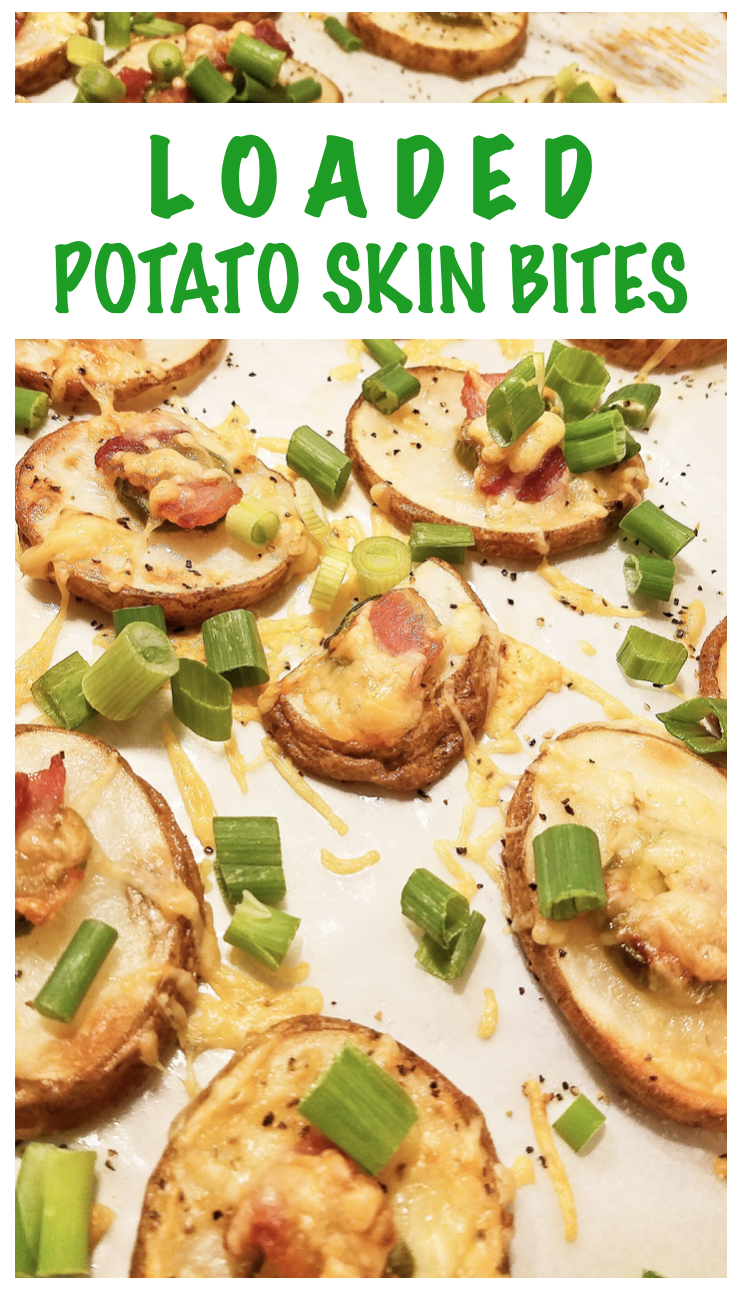
Spicy Potato Skin Bites

Ingredients

4 Medium Size potatoes

4 Jalapeno Peppers

1-1.5 cups of shredded sharp cheddar cheese

4-5 Slices of Nitrate Free Bacon

Scallions

Sea Salt

Black Pepper

Directions – The Prep

Pre-heat oven to 350 degrees and line baking sheets with parchment paper.

Slice potatoes into rounds about 1/2 inch thick and place on baking sheet (note: do not slice potatoes ahead of time because they will turn brown (similar to an apple). I made this mistake and had to cut up more potatoes).

Slice japalenos into small rounds (keeping or discarding as many of the seeds as you like – the seeds hold the heat).

Use a kitchen scissor to cut the bacon into small bite sized pieces

Directions – The Assembly

Using a basting brush, VERY lightly spread olive oil on the top of each potato (the bacon will release oils). You just need enough oil to help the salt and pepper stick. Sprinkle with salt and pepper,

Place 1-2 jalapeno and bacon slices along with shredded cheddar on each potato.

Bake for about 30 minutes then top with fresh scallions.

Screen Shot 2018-01-06 at 11.58.17 AM

post-signature-1

Overnight Oats with Almond Butter

Until about a year and a half ago, I was a major morning person. I had no trouble waking up early for work or extra early to exercise. Last year when we bought our house my normal routine got pushed to the side and I found my mornings slipping away {along with my yoga practice}. I am really trying to make an effort to get back into a good morning routine. My mornings always run more smoothly when I prep the night before. On an ideal night, I will have my outfit ready and lunch packed which leaves plenty of time for yoga {or extra coffee} in the morning. Another great way to save time in the morning is to prep breakfast ahead of time. Overnight oats are such a time saver! Today I am sharing my favorite overnight oat combo.

Oatmeal is hands down my favorite breakfast food and quite possibly one of my favorite foods of all time. It is very filling because it’s loaded fiber. I usually avoid instant oatmeal packets {except when traveling} because they’re loaded with sugar. Old fashion oats don’t take too long to make and can be jazzed up with tasty, healthy toppings. For a long time I made my oatmeal totally on the stove. I combine 1/4 cup dry oats with 1/2 cup of almond milk and my favorite toppings {sometimes I will make a larger portion and will increase the amount of liquid proportionally}. Then cook over low heat, for about 10-12 minutes, until the oats were soft and all the ingredients were well combined. The key to great oatmeal is measuring the dry oats and milk, the oatmeal isn’t too thick or liquidy.

My breakfast life changed about two years ago when I started making overnight oatmeal.  After following the Acid Reflux Diet from The 30 Day Heartburn Solution I learned that soaked oats are easier for the body to digest. Letting oats soak overnight allows them to soak up all of the flavors from the other ingredients too. This method also allows for quick cook time when you’re ready to eat {or you can eat them cold}. My oatmeal always consists of 3 main ingredients – oats, almond milk, cinnamon. I switch up my toppings and occasionally add1 TBSP Flax Seed Meal or Ground Flax Seed. You can make 1 jar at a time or a few so you are ready for the week. My favorite combo is almond butter and banana! Here is what you will need to make my favorite gluten-free overnight oatmeal.

Screen Shot 2018-01-08 at 7.43.28 AM.png

Ingredients

-1/4 cup Gluten-Free* Dry Oatmeal

-1/2 Cup Unsweetened Vanilla Almond Milk

-1/2 TSP Ground Cinnamon (or just a sprinkle)

-1 TBSP Almond Butter

-1/2 Medium Banana, sliced

Screen Shot 2018-01-08 at 7.47.11 AM

Directions

In a mason jar combine oats, almond milk, cinnamon sliced banana and flax (optional). Cover with lid and shake the jar. That’s it! Now refrigerate you jar over night for at least 12 hours. (Disclaimer: For a last minute lunch idea, I have made these oats in the morning and let them sit about 4 or 5 hours until lunch. They still taste great, just not quite as good).

Screen Shot 2018-01-08 at 7.40.17 AM

When you’re ready to eat your overnight oats top them with almond butter. You can eat them cold, put the jar in the microwave for 1.5 minutes (if you used a microwave safe jar) or pour your oats into a pot and heat on the stove until warm. If I heat them up on the stove, I pour them right back into the mason jar.

MaraNatha is my favorite almond butter of all time!

*Not all oatmeal is gluten-free. Oats that are grown and processed with wheat, barley and rye grains are contaminated with gluten. Be sure to buy oats that are marked gluten-free.

xo Miss Alyss

Spinach and Butternut Squash Tart

I am a huge fan of spinach and artichoke dip. It’s one of my favorite dishes to share with friends {get my recipe here}. Since I do make it so often, I wanted to change it up a bit and try something new for Christmas. My mind was set on incorporating butternut squash and I soon found myself fixated on attempting some kind of appetizer with a crust. Enter homemade gluten-free dough…what was I thinking?!

I openly admit I am not a huge fan of baking because it requires precise measurements and adhering closely to recipe instructions. Gluten-free baking is even more difficult and often seems like a science project, but I decide to give it a go for Christmas. For the tart crust I followed this recipe from King Arthur. To mix the dough I used my Kitchen Aid mixer with a paddle attachment. If I were to make this recipe again, I would probably use my food processor because I think it does a better job of cutting butter into the dough. After the dough was mixed I let it chill overnight and let it sit at room temperature before I began rolling it out.

I am not sure where I went wrong, but the dough was not easy to work with once I began rolling. It just kept falling apart. I actually had to kneed {I use that term lightly} the dough before I had any luck with rolling it out. Since I had trouble rolling out the dough it did not end up being large enough to make individual tarts. Instead, I opted for a pie size tart. To my surprise, the dough cooked really well and provided a tasty crust with good texture for this dish. The filling was much easier to put together. I love how all of the flavors infused together. The filling ingredients below make enough for two tarts or one tart and a bowl of dip.

Crust

For the tart crust I followed this recipe from King Arthur, but I actually used Bob’s Redmill Gluten-Free 1:1 flour  and omitted the xanthan gum and Instant Clear Jel.

Filling/Dip Ingredients

16oz frozen spinach

16oz frozen butternut squash

8oz Asiago

3/4 tsp salt

1/2 tsp black pepper

1/4 tsp red pepper

1 small onion

2 large cloves of garlic

 Directions for Tart

Preheat oven to 425 degrees

Follow the King Arthur recipe for the crust and roll each section of dough into a roughly 12 inch circle.

After thawing and draining the squash and spinach, combine all ingredients in a large bowl. Once combined, spoon mixture on to the bottom crust on a parchment lined baking sheet.

Brush egg wash around the edge of the crush then place top crust over the filling. Use a knife to trim the crust if needed then use a fork to press the edges together.

Pierce the top of the tart with a fork to let steam escape and brush the top of the tart with the remaining egg wash.

Bake tart for 20-30 minutes or until top is golden.

Directions for Dip

Add 8oz cream cheese to the remaining filing and combine well.

Spoon the mixture into a lightly greased casserole dish then sprinkle with panko bread crumbs and Pecorino Romano cheese.

Bake in a 350 degree oven for about 30 minutes and serve hot with fresh tortilla chips.